

The following is an overview diagram of our setup. Note that this post does not cover HA setup although it is possible to extend it further by running the instances in multiple AZs.
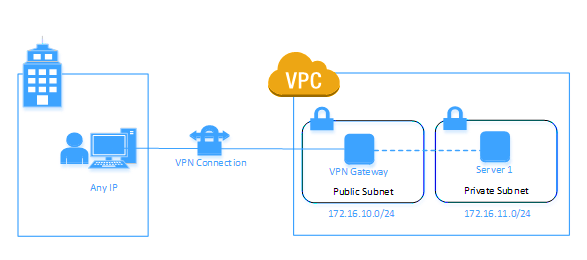
In our VPC, we have public and private subnets: in our public subnet, we have the openVPN instance and in our private subnet we have the web server (server 1). This configuration allows you to separate public & private traffic by terminating all internet traffic at the public subnet layer. It is possible to have your internal instances in the public subnet where your VPN instance is located but the above model provides more isolation.
The steps
To configure your VPN, perform the following:
Create a VPC
- VPC range: 172.16.0.0
- Public subnet:
- Contains the VPN EC2 instance
- Create an internet gateway
- Attach the internet gateway to the public subnet
- Route to the internet using Internet gateway
- Private subnet:
- A Amazon Linux AMI server
- Route to the public subnet
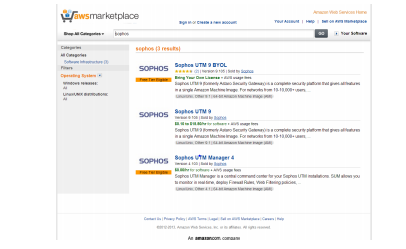
Create a new UTM 9 image
- Launch a new instance and select AWS Marketplace

- Search for UTM 9
- Assign the server to the public subnet and an Elastic IP
- Security Group should have the following services opened:
- SSH
- HTTP
- HTTPS
- TCP 4444
- ICMP
Disable source/dest check on the VPN server – to allow communications via the VPN tunnel

Setup the VPN server
- Use Putty to connect to the VPN machine (download). Right click the instance in EC2 and select “Connect” and follow the instructions to connect
- Logon to UTM UI from your browser and start the configuration :https://172.16.X.X:4444/
- On first login you’ll need to define admin password and details.
Great!! now let’s go down to bussines-
First, you need to create a user account which is necessary for accessing the User Portal and for actually using the VPN connection.
1. Open the Definitions & Users > Users & Groups > Users tab.
2. Click the New User button. The Create New User dialog box opens.
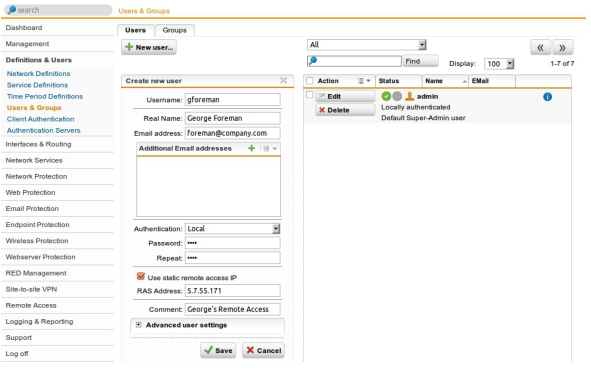
3.Make the following settings:
Username: Enter a specific username (e.g., gforeman). In doing so remember that the remote user will need this username later to log in to the User Portal.
Real name: Enter the full name of the remote user (e.g., George Foreman).
Email address: Enter the e-mail address of the user. When you specify an e-mail address, an X.509 certificate for this user will be generated automatically while creating the user account, using the e-mail address as the certificate’s VPN ID. The certificate will be displayed on the Remote Access > Certificate Management > Certificates tab.
Authentication: With the Local authentication method the following two fields will be displayed for the definition of the password. Configuring UTM
Password: Enter the password for the user. In doing so remember that the remote user will need this password later to log in to the User Portal. Repeat: Confirm the password.
Use static remote access IP (optional): Each remote access user can be assigned to a specific IP address. The assigned IP address must not originate from the IP address pool used in the remote access settings (see below). During the dial-up the address is automatically assigned to the host. Enter the static IP address in the RAS address box.
Comment (optional): Enter a description or additional information on the user.
4. Click Save. Your settings will be saved
Configuring IPsec Settings
configuring basic settings and access control.
1. Open the Remote Access > IPsec > Connections tab.
2. Click New IPsec Remote Access Rule. The Add IPsec Remote Access Rule dialog box opens.
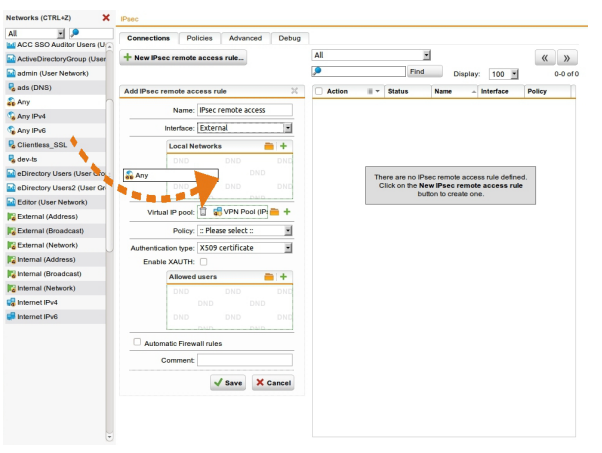
3. Make the following settings:
Name: Enter a descriptive name for this connection.
Interface: Select the network interface which is used as the local endpoint of the IPsec tunnel.
Local networks: Select the local networks that should be reachable to the client. Note – If you wish the IPsec-connected users to be allowed to access the Internet, you need to select Any in the Local networks dialog box. Additionally, you need to define appropriate Masquerading or NAT rules.
Virtual IP pool: The default settings assign addresses from the private IP space 10.242.4.x/24. This network is called the VPN Pool (IPsec). If you wish to use a different network, simply change the definition of the VPN Pool (IPsec) on the Definitions & Users > Network Definitions page.
Policy: Select an already defined policy (in this example: AES-256). Or you can use the IPsec > Policies tab to define your own policies.
Authentication type: IPsec remote access supports authentication based on CA DN match, Preshared key, and X.509 certificate. The settings in this section depend on the authentication type: l CA DN match The authentication is based on the Distinguished Name (DN) and the following widgets are displayed: Authority: Select the certificate authority VPN Signing CA for the VPN users. DN mask: In order to use a Distinguished Name as an ID, you will need information from the X.509 index.
4. Click Save. Your settings will be saved.
5. Enable the IPsec rule. You can enable the rule now or later after completing the whole UTM configuration. Click the status icon in front of the rule to activate the rule. The status icon turns green. The IPsec remote access rule is active now.
Creating Firewall and Masquerading Rules
Defining a Firewall Rule Only for authentication based on X.509 certificate, you do not need define this firewall rule if you have enabled the Automatic firewall rule function during the configuration of IPsec.
1. Open the Network Protection > Firewall > Rules tab.
2. Click the New Rule button. The dialog box Create New Rule opens.
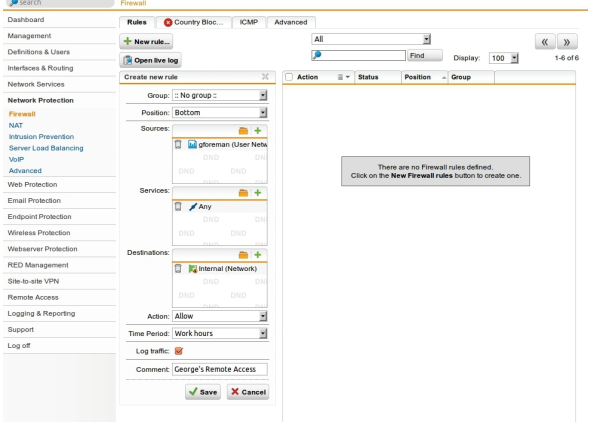
3. Make the following settings: Sources: Add the remote host or user (in this example: gforeman). Services: Add the allowed services. Destinations: Add the allowed networks (in this example: Internal (Network)). For the remote user to be able to access Internet you should e.g. select the Internet or Any network definition. Action: Select Allow.
4. Click Save.
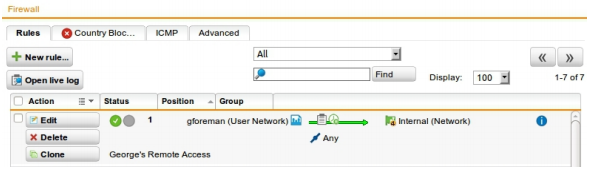
The new firewall rule is added to the list and remains disabled (status icon shows red).
5. Enable the rule by clicking the status icon. The status icon turns green.
Defining a Masquerading Rule Note
Masquerading is used to mask the IP addresses of one network (in this example: gforeman) with the IP address of a second network (e.g. External). Thus remote users who have only private IP addresses can e.g. surf on the Internet with an official IP address. Depending on your system configuration masquerading can also be necessary for other connection types.
1. Open the Network Protection > NAT > Masquerading tab.
2. Click the New Masquerading Rule button.
3. Make the following settings: Network: Select the network of the remote endpoint (in this example: gforeman). Interface: Select the interface that should be used to mask the clients (in this example: External). Use address: If the interface you selected has more than one IP address assigned, you can define here which IP address is to be used for masquerading.
4. Click Save. Your settings will be saved. The new masquerading rule is added at the end of the list and remains disabled (status icon shows red).

5. Enable the rule by clicking the status icon. The status icon turns green.
6. Optionally, activate the proxies: If the remote employees should access URL services via the remote access you may configure the required proxies on the UTM – this would be the DNS and HTTP proxy for example.
7. Open the Management > User Portal > Global tab. The User Portal needs to be activated for the remote access user. If the status icon is red, click the Enable button to enable the User Portal.
8. Select the networks that are allowed to access the User Portal. To the Allowed networks box, add the networks that should be allowed to access the User Portal (in this example: Any or the respective VPN Pool, or just gforeman).
After configuring the VPN server (headquarter) you need to configure the road warrior. Depending on the security policy of your organization and the requirements of your network, you might have to make additional settings.
Configuring the Remote Client
On the remote client you first need to download the Sophos IPsec Client software and configuration files from the UTM User Portal. Then you install the software and configure the installed software.
Getting Software and Certificates The UTM User Portal is available to all remote access users. From this portal, you can download guides and tools for the configuration of your client. You should get the following user credentials for the User Portal from your system administrator: IP address, username, and password. Especially for the IPsec remote access based on authentication with X.509 certificate, the User Portal offers the Sophos IPsec Client software, the configuration files, and necessary keys.
1. Start your browser and open the User Portal. Start your browser and enter the management address of the User Portal as follows: https://IP address (example: https://218.93.117.220). A security note will be displayed. Accept the security note. Depending on the browser, click I Understand the Risks > Add Exception > Confirm Security Exception (Mozilla Firefox), or Proceed Anyway (Google Chrome), or Continue to this website (Microsoft Internet Explorer).
2. Log in to the User Portal. Enter your credentials: Username: Your username, which you received from the administrator. Password: Your password, which you received from the administrator. Please note that passwords are case-sensitive. Click Login.
3. On the Remote Access page, download the tools and/or configuration guide for setting up your remote access connection. This page can contain up to four sections, depending on the remote access connection types (IPsec, SSL, L2TP, PPTP) your administrator enabled for you. At the top of each section you find an Open installation instructions in new window link which opens the respective remote access guide, one of which you are currently reading.
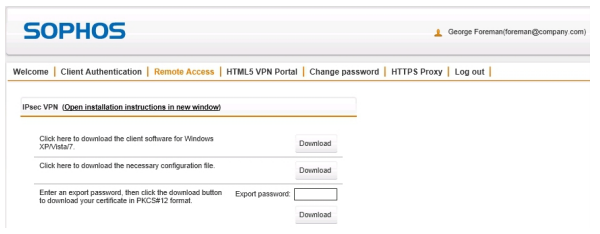
The IPsec VPN section contains the executable client software, configuration file, and certificate (if selected) for the remote access client. In the Export password field, enter a password to secure the PKCS#12 container before downloading the certificate. Note that you will need the security password of the certificate later on. Start the download processes by clicking the respective Download button. Download all files and store them in a location of your choice. You will need all those files later on when installing and configuring the Sophos IPsec Client.
4. Close the User Portal session by clicking Log out. The rest of the configuration takes place on the Sophos IPsec Client.
Configuring the Sophos IPsec Client
First you have to start the Sophos IPsec Client installation via double-clicking the downloaded exe file and follow the necessary steps in the installation wizard. As a separate software it has its own documentation. You can instantly use the 30-day trial licence or activate the software using the purchased licence key. After installation, in order to configure the Sophos IPsec Client, proceed as follows:
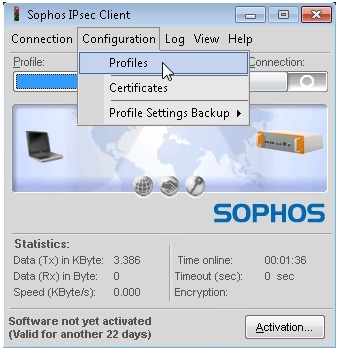
1. Import the user’s configuration file. The profile settings of the INI file have to be imported to the Sophos IPsec Client. In the Profile dialog box, click Add/Import. The New Profile Wizard appears. Follow the steps of the wizard to import the user’s configuration file.
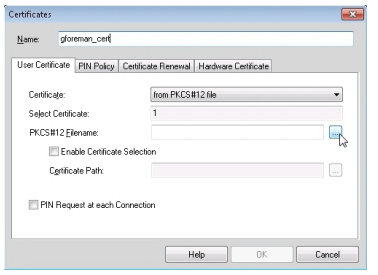
2. Import the PKCS#12 file. Open the Configuration > Certificates menu of Sophos IPsec Client. Click Add. Enter a Name, and as Certificate select from PKCS#12 File. Then click the button next to PKCS#12 Filename. Browse for the PKCS#12 file of the user and select it. Store the key by clicking OK and close the dialog box.
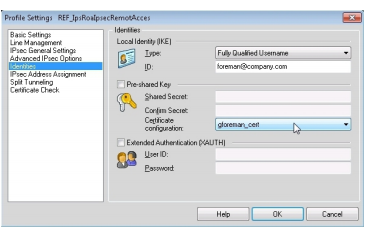
3.Open the Configuration > Profiles menu on Sophos IPsec Client. In the Profile dialog box, select the imported profile, and click Edit. On the left, select the Identities entry. From the Certificate configuration drop-down list, select the previously imported certificate. Click OK.
Connecting to the VPN
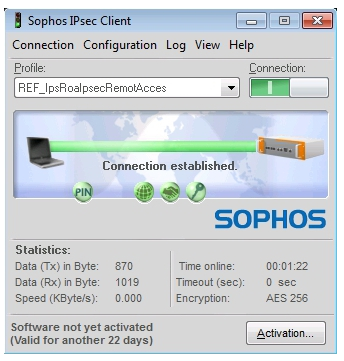
In Sophos IPsec Client, click the Connection button. If the connection establishes successfully, you will see a green bar and the information Connection established, as displayed in the figure. Additionally, the Tray icon of Sophos IPsec Client switches from red to green. If you chose X.509 as authentication method, a PIN dialog will open when connecting to the VPN. In this case, enter the password you used for downloading the PKCS#12 container from the User Portal. The Sophos IPsec Client has a caching mechanism. So during normal operation (connect/disconnect) it is only necessary to enter the PIN once. It is only after a restart of your computer that you need to enter the PIN again. Alternatively, you can connect from the Sophos IPsec Client Tray icon menu. Right-click the icon , and select the Connect entry from the context menu.

NC backs up /etc/hosts and /etc/resolv.conf to /etc/jnpr-nc-hosts.bak and /etc/jnpr-nc-resolv.conf respectively. It tries rersote them once you disconnect, so all you need to do is to edit all four of them when things get nasty and you’re good to go